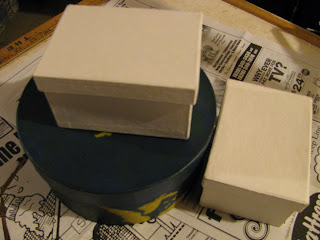
~*a few fabric covered boxes and an 'olde', prim bottle*~
This bottle was found in one of the outbuildings on our property. It was filled with dirt and ick... but a good washing made it usable... for decorating anyway. It isn't that old... but years of 'farm' wear made it look as if it is. I found the label in a great stash I had purchased a while back from Yankee Lane Primitives. (I just LOVE her labels ~ they are rich in color and coffee fragrance!) I wanted a 'tall' label, but only had 'wide'... I filled the finished bottle with whole cloves & tied on a scrap of grain sack to keep them put. Kinda a fun finish... don't ya think?

~*~*~*~ Would you be interested in a tutorial?~*~*~*~
There have been many GREAT tutorials given online for fabric covered boxes... but I thought it might be nice to share how I do it. Most of what I do is the same as everyone else... but here and there I think my ways are a little different.
Start by choosing your box. For this tutorial, I have chosen paper mache' boxes. I buy them mostly at the craft or discount stores, but occasionally I do find them at garage sales. So what if they are painted with something you don't wish to decorate with in your home. It is only paint... and you can paint over it.

Next, gather your thoughts and ideas to pick your fabric and embellishments. For these boxes, I wanted to attach a simple cross stitch to the tops. I found a design that would fix my needs & started stitching on some scraps of linen. (This Quaker squirrel design is part of a sampler offered by Needleprint.com... a $1 donation will allow you to download the full chart!)
The next step is to paint your boxes. Use regular craft paint ~ paint both the inside and outside of your boxes. While you are painting, don't worry about being perfect. A little variation of thick/thin paint will only add to the finish. Plus, the fabric will be covering most of the outside anyway.

Now, grab your matte-finish Mod Podge and begin by decorating the inside of your boxes. For these, I decided to use some old hymn book pages. They are yellowed, and slightly brittle... but give a nice look. Cut the pages to fit the inside bottom and under the lid.

Using an old, cheap paintbrush... paint a thin coat of Mod Podge first...

Place your paper on top of the glue... then apply a thin coat over top of it.

You are ready to start with the fabric on the outside now. I am a 'ripper'... meaning I measure what I need & rip the fabric instead of cutting it. I like this better because of the frayed edge it leaves. Measure your desired fabric to fit around the outside of the box. Rip it so it is one long strip.

Apply a thin coat of Mod Podge to the outside of the box. Place the fabric and apply more glue until it is covered. *** You can apply the glue over the fabric if you desire. These boxes I have done both ... one has the glue over the fabric and one does not (the larger box doesn't have glue applied over top). Either way is fine & primly attractive when finished.

Let your glue dry over night. *** Do Not leave setting on newspaper... be sure to place your items on foil or other surface that can be easily removed. Yes, I know this from experience. :)
Your next step is sanding. Use any grade sandpaper you wish... I have used it all, just whatever we have around the house. Today, I had box a 60 grit and a 150 grit. The rougher the grit, the rougher the finish. You can sand by hand, or on open areas use the palm sander. Sand all surfaces of your box... inside and out ~ over the paint, paper, and fabric. The intent is to mar the surfaces so they look as if they have been through lots of years and wear n' tear.

Now, grab an old rag and your brown shoe polish... it is time for some staining! Rub as much or as little polish as you want. The brown in the polish will 'stain' your piece... and the wax will give it a good 'seal'. Do this to all areas of your boxes... inside and out. Use a cleaner rag to whip off any excess. Set aside to dry for a bit afterward.

Your next step is to add the embellishment... in this case, the cross stitch pieces. I trimmed the linen and frayed the edges to the size I wanted. Using a sharp needle, thread, and a THIMBLE... begin on the outside to poke a hole in the lid. Do this slowly and carefully. Once the needle goes through the box ~ twirl it around a little to widen the opening. (You may be more comfortable using a small drill bit to make the holes. Some paper mache' boxes are 'tougher' than others.)

Remove the needle. Knot your thread and bring it up from the underside of the lid... then down. You will want your knotted thread to start and stop on the underside. Make about three stitches to hold each corner of your design. Knot to finish.

On the backside, to give a little added strength... it is a good idea to dab a little Tacky Glue on the knots. This will dry clear. You don't need much.

These boxes go together quickly... and make sweet gift boxes. In fact, one of these is a gift box... but I can't share 'for who' just yet.

Please holler if you have any questions about how to do these. I'm always happy to help!
Oh... I mentioned the squirrel design... but haven't mentioned the 'olde crow' design. It was an exclusive design I offered to an online group recently. It was only for that group.
~*~*~*~*~
Wishing you all a wonderful weekend ahead... and don't forget ~ there is still time to enter your name in the give~away if you haven't already done so! (it is just a couple posts below)
Warm smiles...
Betty


Betty....thanks so much for the very helpful directions you gave for making a prim box. I love reading your blog and I always love seeing all of your work.
ReplyDeleteLinda
Betty ~
ReplyDeleteThanks! Great tutorial. One of these days I will have to try it.
Pug hugs :)
Lauren
Wow! Love your work Betty. Will have to try that 'ole box.
ReplyDeleteThanks.
Jack...
Love the boxes and the bottle! Thanks so much for the tutorial!
ReplyDeleteThis is such a great tutorial. So easy that I think that I can do this!!!!
ReplyDeleteYour choice of fabric is so prim.
Thank you so much for sharing this with me...I also like the shoe polish idea!
Betty ~
ReplyDeleteI love both of those and thanks for a great tutorial. I will definitely try that soon. Love that crow design ~ sorry I missed out.
Pam
Oh my goodness Betty, I just love your tutorial. Your directions were clear as a bell. I look forward to trying this. Would make wonderful gifts!! So kind of you to share!
ReplyDeleteAlso love the bottle and how it turned out. Good job!
love the boxes~thanks so much for the tutorial!
ReplyDeleteSuch a cool and clever way to dress up a box. I've done this once to a round shaped box and fell in love with Mod Podge. I've never used shoe polish, but I do have some and now I realize another use for it. Thanks!
ReplyDeleteGreat tutorial - thanks for sharing!
ReplyDeleteGreat tutuorial Betty! I love the shoe polish idea! :)
ReplyDeleteBetty, what a great tutorial. I can do this except for the cross stitch, forgot how and too hard to see it, but the crow is my fav. since I am a crow lover and the squirrel's just flattened one of my beeskeps, they kept taking the stuff it was made out of to make their nests. So not a big squirrel fan right now.lol.
ReplyDeleteThanks so much for sharing all your talent with us.
These are just so darned cute! Thanks for sharing the tutorial. You are so talented and so creative.
ReplyDeleteI have tried and tried to make a decent-looking covered box, and now I know where I've gone wrong. One problem has been the glue I've used. Thanks SO MUCH for your tutorial and all the great accompanying pictures. I feel brave enough to give this another try!
ReplyDeleteBetty: thank you so much for a great tutorial! now I can stitch even more with another way to finish!
ReplyDeleteBetsey
Thank you for a wonderful tutorial. Now I can stitch even more with another way to finish off my stitching!
ReplyDeletethank you!
Betsey
These are pretty cool! I love the primitive look. How interesting.
ReplyDeleteYou have such a great blog!! You are so generous with your patterns and now this great tutorial. I am so going to have to try these!! Thanks so much. Have a great weekend.
ReplyDelete~Melissa~
love the tutorial!!!
ReplyDeletei sure do wish we could have the old crow pattern too.
( hint hint).:)
thanks betty for working hard for all of us.
kim
I really enjoyed finding your tutorial today. I have a stack of boxes and I'm in the mood for exactly this type of project. Your colors are so warm and rich. It never occured to me to check old vintage books while scanning yard sales and good will....I'm thinking poetry books with yellowed pages....hmmmm thanks so much!!! ~Sam
ReplyDeleteBetty...your tutorial is great! I have made these boxes before, but with great difficulty...your directions are so much better. I am anxious to try this method. Thanks for the link to the labels..I love her labels!
ReplyDeleteBobbie
Betty,
ReplyDeleteThanks so much for the great tutorial! I want to try this! Your pieces turned out so cute, love the bottle too.
Sharyn :-)
I like your boxes...what a great idea for small stitchery! Great tutorial for them. Happy Fall!
ReplyDeleteGirl! when do you sleep?
ReplyDeleteI'm the proud owner of one of these boxes. My sweet DIL gave me one this week end for my BDay. I just love it Betty Thanks again
ReplyDelete:) I'm so glad you like it Mary! And just for the record... Mary has the one with the squirrel on it. It was part of her birthday present. ;)
ReplyDeleteSmiles,
Betty
Good morning,
ReplyDeletethis job for boxes is exceptional!
Thank you for teaching.