Hello Dear Friends! The other day I shared these little bird feeders with you and promised to share how I made them. This is how...
You will need ~
1 teacup and saucer (Visit your local thrift shop for an inexpensive, but sweet one. I was able to find several china, ceramic, and even a tin set pictured above for less than $3 each.)
3/4" wood dowel
E6000 Glue
Fender Washer (I didn't get the size, but about 2" diameter will work well.)
2" Wood Screw
Exterior White Paint
Rubbing Alcohol
Paintbrush, drill, and screwdriver or a screwdriver bit for your drill
Begin by drilling a pilot hole into one end of your dowel...

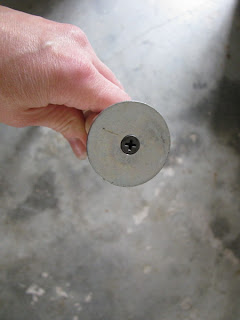
Next, you will attach the Fender Washer to the end of your dowel with the Wood Screw. A Fender Washer is like a normal washer, but the hole in the center is smaller. This will allow the Wood Screw to hold the washer to the dowel.


Try to make sure that the Wood Screw and Fender Washer have a flat top/end ~ like so...

Next, using your Rubbing Alcohol, clean the undersides of your cups and saucers and wipe the Fender Washer as well. This will remove any dirt and oils that may interfere with the glue.

You will now apply the glue...

Let me take a second to warn you about this stuff... it stinks! Please be safe and use it in a well ventilated area!
This glue does take awhile to set up. I found it best to let this next step spread out into a couple of days to allow the glue to set well.
Apply the glue to the underside of the cup and set it in place on the saucer.


Once your cup and saucer has been glued together, and the glue is set well... apply a glob of glue to the Fender Washer end of your dowel...

I set my cups down with the dowels up... however, our basement floor (again, I should have done this outside... the glue STINKS!) is not level and the dowels kept falling off. Be sure to find a good LEVEL surface if you do it this way. And you will probably want to be outside.

Oh, and another thing I noticed, the tin cup & plate needs to be in a warm spot. It slipped the worst with the glue... but did eventually hold.
Once your glue has dried well, paint the dowels with exterior paint and let dry.
You are finished! Poke your new feeder in the dirt (be careful not to push down on the teacup & saucer... push down with the dowel only to avoid knocking it loose from the dowel. This is some strong glue, but you don't want to mess up your finish.) Fill your cup with clean water... and sprinkle the saucer with some bird seed (you can see in my finished photo... I haven't picked up my birdseed yet... oops!). A nice treat for the birds... and a pretty for your gardens!
Another thing I might mention... my dear Mom reminded me... don't let water freeze in your teacup. It could crack the cup.
I hope you enjoy the ~*How I Made It*~... and make yourself, and maybe even a friend, a sweet teacup bird feeder!
~*~*~*~*~*~
In some Cross Stitch News... I received a call from the frame shop last night. My next schoolhouse sampler is ready for pick up. I'm almost finished with the second finish for the pattern... so if all goes well... it will be released NEXT WEEK! :-)
Wishing you warm smiles...
Betty


Thank you soooo much! I say something like these in a magazine last year but they didn't let on what type of glue to use!! I am going to print out your post today and make some of these for next spring! THANK YOU!!!!
ReplyDeletethank you so much dear..i really love it so much..i will soon try to make it..just waiting for the rain to go away..these are very lovely bird feeder..
ReplyDeletethank you for sharing:)
love and hugs for you xxx
What a cute idea. How is your job coming along? It sounds like you would be a great server!!!!
ReplyDeleteSuch a sweet idea Miss Betty - I especially love the tin one...and what fun and relatively easy gifts they would make. Thanks so much for the clear "how-to's!" Smiles & Hugs ~ Robin
ReplyDeleteGreat Idea...I've been wanting to make one of these for years...this is the easiest way that I've seen so far!! Gonna try it. Thanks!
ReplyDeletepatti
These are great! Hope all goes well with your patterns. Have a great week!
ReplyDeleteThose are just so cute. I love the white tin one.
ReplyDeleteThank you for showing us how you did it. I never would have figured out how to get the saucer on the dowel rod.
Thanks Betty for the lesson. Such wonderful feeders for the birds and they really look great in the garden. Looks like you are getting some crafting time between working.
ReplyDeleteThat is so neat, love the idea. I hate the regular bird feeders, the seed gets stuck and then icky inside, so hate using them.
ReplyDeleteDebbie
What a FABULOUS project!
ReplyDelete