


Hello Dear Friends!
I've been crafting up gobs of things... for a couple of events that are quickly approaching.
On October 12th, I will be set up to demonstrate, show, and sell my wares at Cabin Antiques located at beautiful Lake Wabaunsee. Pam, the owner of the cabin, is having her Customer Appreciation Days... and has generously offered both my Mom and I to be there. (My Mom makes the sweetest crochet critters! Her Etsy shoppe is called Sweatheart Threads. Have you visited her?)
On November 7th, I will be doing more demonstrating, showing, and selling at Fairlawn Plaza Mall in Topeka, Kansas for the 1st Friday Art Walk. My dear friend Kris, who owned the famous Dickerson Antiques, invited me to join that event.
I am just giddy about both of these!!!
At both shows, I will be doing Oxford Punch and Needlepunch.
I thought y'all might like to see more about Oxford Punch right now. One blogger asked too... where to get good wool yarn.
Let me answer that first...
I have purchased great wool yarn from Halcyon Yarn.
I have also purchased wonderfully, dyed yarn from my good buddy, Ginger... Prairie Moon Primitives. Ginger has her website closed at this time though, because she is preparing to set up her wares at Silver Dollar City... September 12th ~ October 26th. Maybe you can go visit her? She will have TONS of GREAT things!!!
I have also been lucky enough to get wool yarn at thrift stores and garage sales. However, most of the yarn found at those places is acrylic.
You can also use wool fabric... cut to a size 6... or about 5/8" wide (I think). If you use wool strips, you will want them to be at least 18" long so you don't have to re~thread so often.
Here is how I made these...Part 1

I started with some plain boxes. They were painted, distressed and waxed (with shoe polish). This photo is only of the painted boxes... without the final treatments.

I use the #10 Oxford needle...

I punch on Monk's Cloth. The fabric on the left is the 'cheap' stuff you can get at the discount stores. The fabric on the right is the better rug hooking quality. Either will work. For this project though, I used the cheap stuff. HINT**** When working with the lower quality fabric ~ WASH AND DRY IT FIRST TO TIGHTEN THE WEAVE. It will help!!!

Stretch your fabric super~drum~tight on your rug hooking frame... then stretch it even tighter! (You can use a hoop, but will be much happier with a gripper frame.)
Mark your outline. HINT**** The Oxford punch will stretch out your design! Because I want my pieces to fit on the lids of these boxes, I made them about 1/4" smaller all around. The outline on the left shows where I traced the box... then drew a line on the inside to work with. For the circle, I just used a compass.

To thread the needle...
Begin by threading the hole in the top with your yarn or fabric... with the open side of the needle up... like so...

Align the yarn with the groove in the needle...

Then pull on the end of the yarn so the yarn will work down into the groove...
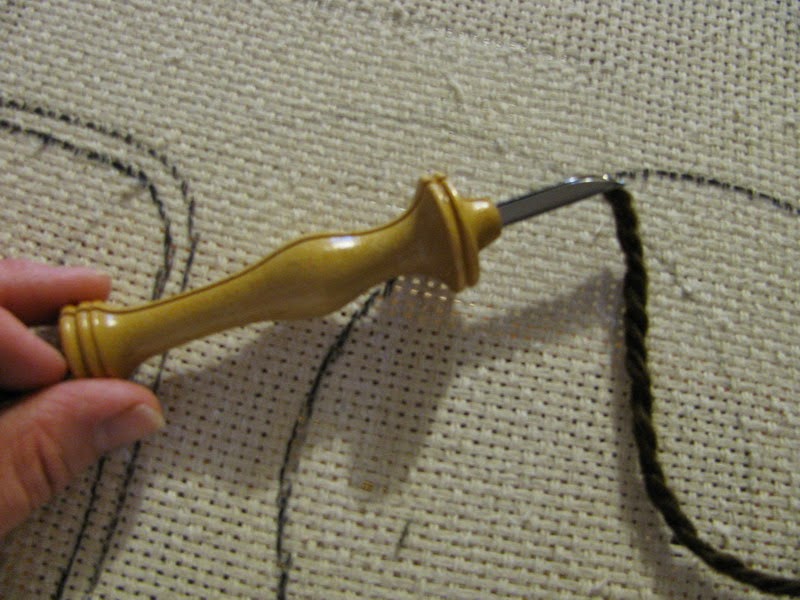
Next, pull back on the yarn so you have about an inch or so still showing... this will be your tail...

Don't allow the yarn to get tangled or caught on anything. It needs to flow freely through the Oxford Punch. I drop mine into a wooden bucket...

Begin punching. Remember, you are working on the BACKSIDE of your finished piece. Press the needle down into the fabric until it hits the wooden handle. Leave the tail sticking up for now. It should be about an 1". Punch down, pull up ~ but don't lift the metal part of the needle off the fabric. Drag the needle a little (maybe 1/4")... then punch down again. Repeat and repeat until you want to change yarn or fabric.

Later, cut your tails off even with the top of the fabric.

Punch your rows next to one another. Don't worry about over~crowding. If you have punched and later can see a gap from the front side... simply punch some more to fill it in.

After all the punching is complete... use Tacky Glue or Elmer's glue... put a generous amount along the outside row... covering the first row of rug punching and about 1/2" past to the unpunched fabric.

Let it dry.
Another HINT**** Don't worry about snags on the front side of your work!!! This will be cleaned up before you are all finished. Snags will happen!!! It is impossible for them not to!!!
For my box lids (pictured at the top)... I punched a row ~ plus some (meaning I overlapped a little) with wool yarn... then I punched a row ~ plus some wtih wool fabrics. I repeated yarn/fabric/yarn/fabric until it was all punched. I started on the outside and worked to the center.
I'll share how to finish the pieces for the boxes in the next post. Honestly... I was worried there were too many pictures. Hopefully they all load for y'all!
Wishing you warm smiles...
Betty

Great tutorial, but for any newbies, a 6 cut is less than 1/4" (an 8 cut is 1/4").
ReplyDeleteI've had that Oxford punch for years and still have not taken it out of the box. One of these days...sigh.
Hugs :)
Lauren
Great tips, I never thought to wash the cheap stuff.
ReplyDeleteI do have some old linen that I got at the beginning, it is the softer, tight weave. Thinking that might punch nicely.
Debbie